Showing posts with label How-To Guide. Show all posts

How to Find Unknown Caller with Name and Photo

It really gets annoying when we get wrong calls from unknown people frequently. These calls get troublesome and ruin our entire day and also our minds. If the caller talks unwanted things to annoy you it would add up the tension. What if you get the calls on repeat mode when you are in an important work? It would be irritating right? This wouldn't be a pleasant experience when someone tries to prank you or call you from a new number to get you on your nerves. This should be stopped immediately.

How do you stop this from happening? First of all you should be able to find out the person who plays this dirty trick on you. It's very easy to find the person who is annoying you. Let's look at a few solutions to put a stop to this problem. There are two apps available which are called. Eyecon and sync.ME. These two apps can be downloaded on your Android device. These apps work great in terms of finding the anonymous caller by disclosing the Id of that person.


Eyecon has some amazing features like letting us know the name of the person along with the picture of that caller. The app detects the picture of that person by his social media as their number would be linked to accounts like Facebook etc. Another important feature available is, it automatically blocks the spam and scam calls that you get. This option is really very good to avoid from getting unwanted calls.

There's another interesting feature in this app which allows you to know if the person you are calling is on another call or is available to talk. Eyecon app is very useful in terms of finding out the person who calls you to annoy you.

So now we've looked at the features of the Eyecon app so let's move with the features of sync.ME app. Sync.ME app also helps you find the name of the person and also the picture via social media similar to the other app. This app also can detect robocalls and spams instantly. Sync.ME app is well known and is pretty good in finding out the unknown caller. Finally this will stop those wrong calls from occurring often, so that you can be at peace.

Now you know two apps which can relieve you from unwanted calls. Both of these apps work great so it's up to you to choose the one that suits you. So if you are confused which one to download then take a look at the brief introduction that's given below, which will help you come to a conclusion.

How to Find Unknown Caller Name and Photo?

First you have to download Eyecon app directly from Google playstore to your Android smartphone.

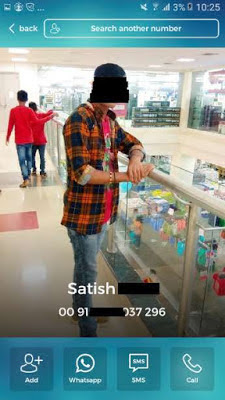
Now let's see how to trace the unknown caller ID with his picture from his social media. This is quite easy.

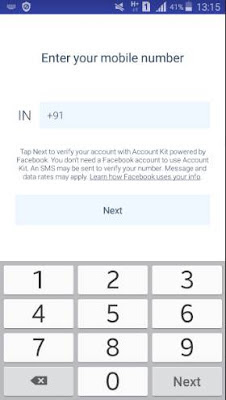
After you download the app, launch it on your device. Then enter your mobile number to get registered into the app so that you can find out the caller.


Next, start the app and go to the home tab. Then tap the search bar and enter the number of the caller with the country code. That's it.


Now it will start searching. Just in a few seconds it will reveal the person's social media ID , name and the picture. Amazing isn't it?


That's all you got to do . Now you know how to find out the details of the person who's been calling you without an end. This app is very useful if you want to find out the culprit. Next we will see how to use sync. Me app to track anonymous calls.

How to find unknown caller using sync.Me

To download the app sync.Me head to the play store so you can directly download it to your phone.

Now launch it in your phone and to continue type in your mobile number which will sign into the account. Continue with the other steps after logging in.


Then head to the home screen of the app and you will find a search bar. Type the mobile number that you intend to search.


Now the app will start to search for the details. Now it will reveal the caller's ID along with the pictures. The details will be pulled from the social media accounts in which the number is connected to. It will also show the email address and many more details.


That's it, now we know how to use sync,Me app to find out the anonymous callers details.

You can download both the Eyecon and Sync.Me app directly from Google playstore to your mobile device.
Download Sync.Me

Which app is best to find unknown callers?

As we saw above, both the apps have somewhat similar features and both work great. The app allows you to find out the callers ID along with the picture which is wonderful. It is recommended that you download both apps so that if one app fails to find out the details you can make use of the other app. Now you wouldn't be worrying if someone keeps on calling you for no reason. We hope this article was useful.

Now you can easily find out the details of the anonymous calls that's bugging you so you can be free from them.

How to Remove, Change and Set Default Apps on Android

Here’s a comprehensive guide on everything you need to know about managing default apps on your Android phone and adjusting the behavior of links.

You will have certain preference on how the apps in your Android device should perform different tasks although they allow performances such as allowing you to choose which web browser, email client, SMS apps and other tools to be used. This would work automatically when you access content that are related.

From extracting defaults apps, how links open and how to change features in your default app will be thoroughly explained here in this article.


Default Apps in Android


Do you know that the default app in your Android device have the ability to assign which app should perform specific task ? In case if you have more than one web browsers installed, with no settings imposed on default app and you click a link, then your phone will request you to choose the browser that you prefer. So to make things easy you can keep Up to date with default app settings so that you don’t have to encounter this problem every time you click on a link.

Let’s take a look at how to customize your default app to make things easy if you haven’t assigned default app for certain categories.

Set New Default Apps on Android

A prompt will instantly pop on your screen asking you to select which app to use in case if you don’t have a default app assigned for specific actions or you install a new app that can perform the task. The look of the prompt can vary depending on the version and manufacturer of the device as per the UI element of your Android.

So if you want to make the suggested app as your default app for that specific action then you can tap 'Always’ which can save your time and make things easy for you and next time you won’t have to put any effort. This will ensure that your future actions will do the same. What if you want to use this action only for one time? Then you have to select ‘just once’ instead of making it default.


If you want to do it on a different app then you can always choose the one you prefer from the list provided. Next time when you perform this action, this will show on the top preference. You will see the option to set it as default if you wish to.

How to Review and Change Default Apps on Android

You will come across the menu of default app on stock android 12 at settings > apps > default apps. Please note that these settings would differ according to each phones.


Below you can take a look at the default apps that are in use currently for certain categories in your device.

Browser App - This feature is used in order to open the links you click.

Caller ID & spam Apps - This will ensure that you don’t get any spam calls by blocking them instantly. Google call app in your phone and also true caller is included.

Digital assistant App - This helps you identify your screen behaviors and controls voice working as a smart assistant. Alexa and Google assistant are some of the examples.

Home App - This helps you arrange and access apps on your phone as a default android launcher. Nova launcher and pixel launcher are two examples.

Phone App - Simpler dial and the phone app of Google are examples for this. This is what helps your device answer and make calls.

SMS App - This app is what manages your text messages allowing you to send and receive. Two examples are Googles messaging app and pulse SMS.

Tap on the category catered towards your specific needs, to review the installed Apps. You can choose which one you want to set as default if you have more than one app installed for a certain category.

Now any link that you follow will use the app automatically as you have set a default app. Let’s take a look at some examples, if your default phone app is changed, when ever you go to your web browser and tap a phone number, your default app will launch.

There are also other categories available other than the ones that are mentioned above. When you attempt to open your camera through shortcuts while using a camera apps that has been installed using a third party app (for example let’s say you have a pixel phone and use the power button pressing two times). In this case you will be asked by your phone, which camera app you want to use.

Remove Default Android Apps

You can dismiss all default settings of a particular category of that specific app. Let’s see how you can remove it. Here’s how you do it, go to settings > apps & notifications > see all X apps now you can remove the defaults from the app that you prefer.

When you are directed to the app settings, you have to widen the advanced section (only if it is needed) and then click open default option. Now if you take a look at the lower part of the page you will come across clear default or clear default preferences and you can tap on it to dismiss those settings in case if the app is set to default for any actions. Now you can select the app launcher that you prefer when ever you open it, instead of the app taking over the actions.


This feature is not available in the latest Android devices which is not a good thing. When you take phones such as android 12 or 13 you have to abide by the forceful action to choose the category and also clearing the apps default browser is not possible.

Choose Default Apps for Opening Links

We are done with information about default apps on Android devices and now we will take a look at another important aspect that is, the app links.

When you tap on a website link on your Android device and the specific app that is related to the link is also installed then instead of opening the link on your browser the device can take you to the URLs inside the same app. This is what you call deep linking in android advancement. For example, let’s say you tap on a YouTube link, you would want to watch the video within the YouTube app not directing you elsewhere.

You can assign the link to open on your browser or the specific app although you cannot change the URLs opened by a certain app.

Change Link Opening Settings

Do you remember that we visited the default app page in the beginning? All you got to do is return to the same default app to alter how certain links open. To review the links you have to press opening links.


Some apps can also be used without you having to install them, to get this feature, head to the top and all you got to do is toggle the feature.

If you take a look at the section below you can find area where most of your apps are installed in your device. If you chose one of these apps then you will be directed to open by default page where you will come across two fields displayed.

So when you tap open by default which contains two options for the selected apps. One option give you the specifications to see if you want to open compatible URLs which is known as ‘open supported link’. If you come across older versions of the android phones then you will be asked for permissions such as ‘open in this app’, 'don’t open in this app’ or ‘ask every time’ but if you own a latest version of Android device then this option will be available on your slides.

‘Verified link’ can be tapped In order to identify which URL the app can access (in case if it’s an older versions of Android, then ‘supported link’ will be shown) this way you can view the detailed list. So if you Take YouTube app then links such as YouTube.com, m.YouTube.com or YouTube.be will be directed to you instead of other apps. Sometimes you will be able to choose the domain that you want to access that’s available within the app.


Disabling In-App Browsers

When considering default link behavior there’s another setting that you can take into consideration. Telegram, Twitter, slack and Gmail are some of the commonly used apps that have their own inbuilt app browsers which also has the ability to keep track of your activities. Therefore, through these apps when you try to navigate a webpage it will be opened within their own browser window not through the specific app or default browser.

It's bothersome to open a webpage using an in app browser when you are not logged to those sites, that’s the reason why deactivating this feature is the best thing to do. Not all the app has the same location to access their settings but mostly the settings will be seen under ‘open link externally or use in app browser’.

The steps are settings > chat settings > in app browser’ are the order to be followed on telegram app.

Expand Default Apps With Third-Party Solutions

The default option that’s built in android is sufficient for many users but in case if you need more features to be added then you can try a few apps such as :

Better open with,

By making use of this particular app you can revoke it anytime when you establish that specific app you prefer. audio file, dialer, email and browser are some of the categories you will be presented with when you open the app.


Now you can choose the category that you prefer and then click the icon which looks like a start next to the option you chose. In case if you are not interested in some apps and you don’t want to see them in future you simply can hide them by tapping the eye icon. If you want to select preferred settings for each websites then you have the ability to make use of the drop down box, that will be found at the top. For example you can take Twitter or YouTube.

Now you have the possibility to access a certain link that is catered towards it. Now tap ‘better open with’ and select 'Always’ when you have the option of choosing the desired app. A list of suitable apps and a countdown panel will be shown when you chose ‘better open with’ option. The determined app will be accessed if you fail to chose one before the designated time.


So when we take a look at this ‘better open with app’, it isn’t flawless but you can give it a try to use some of it’s features if you like it as it is completely free of charge. The reason why it isn’t perfect is because not all the default app actions such as SMS is supported (which is a big deal) and update takes ages.

Open link with…

‘open link with’ is another app that you can use if you want to have more control on links on your device by altering the default app. Your android device doesn’t allow you to open links linked to specific apps automatically so this app comes in handy to do It. So usually you are directed towards the specific apps when you click a link like Twitter or YouTube but this app allows you to open the link on your browser.


First you have to install the app on Play store and then tap open link with app. Now you will come across a tutorial on how to use it. For a better function allow permission to access app usage as a final step. It’s all done, now you don’t have to think about it anymore. In case if you want to do the same with other apps then follow the step above once again.

Ok so now you want to do the same with another app In your device then go to your browser and click the three dot icon which is the menu button and choose share option. Now you can take a look at the list of designated app for those specific apps by tapping 'open link with’. From here onward you can select ‘always’ if you want the change to be permanent and ‘just once’ if you want to be asked once again when you do it next time.

If you want to open the content in two different apps often or if you have problem while accessing like not functioning link, it’s better to look into it although it’s somewhat related to built-in function.

Default Apps on Android

Once you already setup default app on your phone, it will be so convenient in the future that you won’t even remember it except when you get a new app. Now you are in full control over your apps. These are the very basic settings that are available so in case if you want more advanced features you have more options available for that.

You can get some interesting apps downloaded and installed in your Android phone if you haven’t experienced anything outside the standard default app selections.

Create Shortcuts for Anything on Android Home Screen

If you have a shortcut maker in your device then you don’t have to limit your home screen to only app, instead you can do certain things beyond apps.

Managing all your files and apps on your home screen and keeping it clean from clutters can be a hassle if you own an Android device. This will make you loose track on what you need and what you don’t which is overwhelming, but don’t worry as we have apps like short cut maker to simplify things by decluttering your apps and make them easy to access shortcuts. 


With the help of this apps you can create shortcut and put your favorites in one place which will make things more convenient. No matter if you want to keep your phone interface clean or you want to organize your apps in one place, shortcut maker is the ideal tool to help you.

Here's how to create shortcuts to your apps and files in your device. Let’s take a look.

Shortcut Maker App on Android Phone

You can easily create quick access link for your favorite app, device settings and websites with the help of shortcut maker which is a very easy tool to handle. You can customize shortcuts for the files that you use often or the common applications that you use everyday like Gmail, chrome etc.. on your device.

You not only can create shortcuts for apps but this shortcut maker provides you with advanced features like generating shortcuts for folders, app links, gallery, contacts etc. For easy identification of your shortcut app you can customize icon and also assign descriptive names. These labels make it easy for you to pinpoint the specific app easily.

To start with the shortcut app you have to go to your Google play store and install the app. You can also do in apps donations by payment for the extra features so that it would be a help for the developers although the free version is available. In this article the guide is based of Samsung Galaxy phone. Let’s take a look.

Create Quick Shortcuts - Apps, Folders and In-App Actions

Sometimes we download too many apps and files on our devices that it becomes so clumsy and hard to figure out the important apps when we most need them. So making use of this shortcut app is a very good idea to keep your screen clean and easy to find apps and folders.

You can create shortcuts to you In-App actions, application and other folders using shortcut app. Below is the guide on how to use this app.

1. Go to shortcut maker on your phone and open it and click Apps to create shortcut to the app that you prefer.

2. Now you will come across the app icon and shortcut label as editing options which you have to confirm. You can click "Try this shortcut" to see the preview.


3. Now hit "Create shortcut" to keep the shortcut on the home screen of your device.

4. Click ‘add’ and your shortcut will be created on your home screen.

5. In case if you want to create a shortcut for folder app then go to ‘folders’ which you will find on the home page of the app and now click ‘add’ that’s it, your home screen will have a widget now.

6. You can click ‘settings’ again and follow the same steps to create shortcut for camera settings, memory, battery, Bluetooth etc. to the device settings. All you got to do is choose the settings and then click ‘Add’.


Things are made super convenient with this shortcut feature. Now you can easily access all your favorite or frequently used app, files and activities just on your home screen instead of scrolling or going through app drawer, dashboard or the settings to find each and everything which is time consuming.

There are also other interesting ways to arrange and organize your apps other than shortcut creations.

Let say you order something important on Amazon and want to take a quick view about the status or access information swiftly then you can save this specific order page on to your requested tab as a direct shortcut so you don’t have to open the app and keep finding for details.

Create Shortcuts for Frequently-Visiting Websites

Most of us a so occupied in life that we want things to be easy and time saving so if you are someone who constantly check website for work or other purposes you can create shortcuts links for your website as well. Let see how to get it done.

1. Tap website in the shortcut maker and you will find the option for shortcut name and website link field, all you got to do is copy the URL of the website and paste it.

2. You can also can make changes in the label of the shortcut, app icon, theme, background color etc. This can be done on the confirmation screen.


3. Tap create shortcut option when you are done with the above changes.


4. Now you will be asked if you want to add the shortcut to your home screen, simply click add.

Split-Screen Mode Shortcuts for Two Apps

Do you know that you have an option called Split-Screen Mode where you can open your favorite apps alongside each other on the same screen? You can do with a few simple clicks. Here’s how:

1. Head back to the shortcut maker application and on the options you will find ‘split’ tap on to it.

2. From the given app list choose two apps that you prefer that you will be placing on top and one at the lower part.

3. To make the shortcut be seen on the screen click "Place on home screen".


4. Now the apps that you chose will be seen in the top and bottom of the split screen. That’s it.


Create Shortcut For a Collection of Apps, Settings and More

You can also compile all the application or setting that you prefer into one collection with the help of shortcut maker that can be accessed with just single touch. Let take a look at the steps.


1. First head to the shortcut maker and then click the collection option.

2. Now chose ‘add new collection’

3. Chose one by one the apps or the settings that you want to add on to your shortcut. Add each and everything that you prefer until you are happy with your selection.

4. To add the selected app collection to your home screen choose ‘place on home screen’ option. That’s it.

Save time with shortcut maker

Shortcut Maker is an ideal choice for those who want to add shortcuts to home screen and to keep your apps and links just a click away. This is also a wonderful option to keep your Android phone clutter free. This helps you with providing a wide range of features, many options for customization and a smooth UI all included in just one place.

Restore Data to New Android or Set-it Up From Scratch. Which is Best?

You don’t have to worry when you switch to a new phone as you can transfer all your data and also certain settings to your new phone easily from your old device so that you can have all the important stuff readily available in your new phone.

Have you got a brand new android phone and Wondering how to restore data from the previous phone? Don’t worry if you have already backed up your data or you still can transfer all the data from scratch. Both of these options have their drawbacks as well as benefits so let’s take a look.

Various factors determine the method that you are going to transfer your data to your new device, such as the significance your old data holds, the purpose you are going to use your phone for, preferred user preference, and many other relevant factors. So we will take a look at options that best suits you.


Restore Data to a New Phone

Changing phones wouldn’t be a hassle when you have already backed up all your data such as contacts, photos, songs, videos, important documents, and other things on your old phone. If you constantly backup all the data from your old phone then things becomes easy as you don’t have to transfer data one by one and going through the messy data folders with the help of some third-party application.

It's really important to keep all your data intact if you are selling your old phone once you bought a new one. So to be prepared it’s better you save all your data by backing up so that you don’t end up deleting everything when in a hurry. Factory reset becomes essential when you are selling your phone so the ideal thing to do is data backup.

If you are facing any issues with your Android phone such as app crashes, screen flickers or any other problems then factory reset is what you got to do. So the only way to restore your data back after a factory reset is if you have already made backups plans done. This will ensure that you don’t loose all your important data.

Are you a person who change phones every year or so? People often like to upgrade to new phones once there’s a new release at least few times a year. In this case it’s smart to keep your phone backed up so you don’t have to keep sending all your data one by one which is a hassle. This would consume a lot of time and also effort.

It Is advisable to use the data storage that is readily available in your Android phone rather than relying on third party apps, as you all know these third party apps poses threats such as personal data collection and other. All you have to do is log into your existing or new google account and link your data so that the data will be automatically backed up. Later on you can easily restore this backed up data.

Set Up a New Phone From Scratch

Although restoring data is easiest way to transfer all your data to your new phone but this could consume a lot of storage space also so instead of automatic restore you can begin your device from scratch or send only what’s necessary manually. Doing this could give you enough space for your latest data in the future and discard those unwanted data from your old device. Space is a really important factor when it comes to a phone.


Sometimes accidental restoration can occur which will lead to a full storage in your new phone. This is why some people rely on two phones, so they could manage data. Starting from scratch is somewhat ideal in this situation.

Automatic restoration process could also reduce the quality of your data Sometimes so it’s better to stay away from it if you don’t want it to happen So when your device is loaded with data, the size and the quality of the data might go down because of fast restoration process.

There are also chances that you loose some of your data or files while the transfer is taking place due to low wifi signal or internet signal drops. That is why manual transfer is the best thing to do as you can be mindful of what goes on to the other phone.

Restoring Old Data is Easier

One of the reasons why automatic backup is ideal because it’s much convenient and fast unlike setting it all up one by one manually from scratch. Most of the people don’t bother about minute details like video or picture quality compromise as they use it to save their memorable photos, video, contacts and important files.

Running out of storage is not a huge deal nowadays as the latest mobile devices come with enough storage space like 128 gb minimum. This space would be more than enough for many people.

More engagement and effort is needed from the user to set-up a phone from scratch so this practice isn’t ideal most of the time. People are not willing to waste their time and this will be so inconvenient so the swiftest way is to restore data from your backup. That’s it, now you u can decide what’s best for you.


Lock Unlock Android Phone with Voice Using Google Assistant

Google assistant has some wonderful features that helps you access your device without you having to physically touch it along with that you also have this amazing possibility of unlocking your smart device with your voice command on hands free mode.