How to Find Unknown Caller with Name and Photo

It really gets annoying when we get wrong calls from unknown people frequently. These calls get troublesome and ruin our entire day and also our minds. If the caller talks unwanted things to annoy you it would add up the tension. What if you get the calls on repeat mode when you are in an important work? It would be irritating right? This wouldn't be a pleasant experience when someone tries to prank you or call you from a new number to get you on your nerves. This should be stopped immediately.

How do you stop this from happening? First of all you should be able to find out the person who plays this dirty trick on you. It's very easy to find the person who is annoying you. Let's look at a few solutions to put a stop to this problem. There are two apps available which are called. Eyecon and sync.ME. These two apps can be downloaded on your Android device. These apps work great in terms of finding the anonymous caller by disclosing the Id of that person.


Eyecon has some amazing features like letting us know the name of the person along with the picture of that caller. The app detects the picture of that person by his social media as their number would be linked to accounts like Facebook etc. Another important feature available is, it automatically blocks the spam and scam calls that you get. This option is really very good to avoid from getting unwanted calls.

There's another interesting feature in this app which allows you to know if the person you are calling is on another call or is available to talk. Eyecon app is very useful in terms of finding out the person who calls you to annoy you.

So now we've looked at the features of the Eyecon app so let's move with the features of sync.ME app. Sync.ME app also helps you find the name of the person and also the picture via social media similar to the other app. This app also can detect robocalls and spams instantly. Sync.ME app is well known and is pretty good in finding out the unknown caller. Finally this will stop those wrong calls from occurring often, so that you can be at peace.

Now you know two apps which can relieve you from unwanted calls. Both of these apps work great so it's up to you to choose the one that suits you. So if you are confused which one to download then take a look at the brief introduction that's given below, which will help you come to a conclusion.

How to Find Unknown Caller Name and Photo?

First you have to download Eyecon app directly from Google playstore to your Android smartphone.

Now let's see how to trace the unknown caller ID with his picture from his social media. This is quite easy.
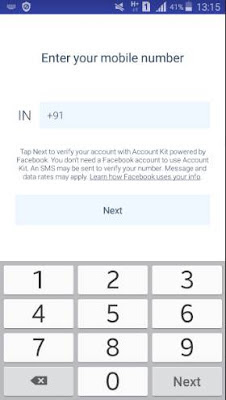
After you download the app, launch it on your device. Then enter your mobile number to get registered into the app so that you can find out the caller.


Next, start the app and go to the home tab. Then tap the search bar and enter the number of the caller with the country code. That's it.


Now it will start searching. Just in a few seconds it will reveal the person's social media ID , name and the picture. Amazing isn't it?


That's all you got to do . Now you know how to find out the details of the person who's been calling you without an end. This app is very useful if you want to find out the culprit. Next we will see how to use sync. Me app to track anonymous calls.

How to find unknown caller using sync.Me

To download the app sync.Me head to the play store so you can directly download it to your phone.

Now launch it in your phone and to continue type in your mobile number which will sign into the account. Continue with the other steps after logging in.


Then head to the home screen of the app and you will find a search bar. Type the mobile number that you intend to search.


Now the app will start to search for the details. Now it will reveal the caller's ID along with the pictures. The details will be pulled from the social media accounts in which the number is connected to. It will also show the email address and many more details.


That's it, now we know how to use sync,Me app to find out the anonymous callers details.

You can download both the Eyecon and Sync.Me app directly from Google playstore to your mobile device.
Download Sync.Me

Which app is best to find unknown callers?

As we saw above, both the apps have somewhat similar features and both work great. The app allows you to find out the callers ID along with the picture which is wonderful. It is recommended that you download both apps so that if one app fails to find out the details you can make use of the other app. Now you wouldn't be worrying if someone keeps on calling you for no reason. We hope this article was useful.

Now you can easily find out the details of the anonymous calls that's bugging you so you can be free from them.

Airplane Mode and How Does it Work?

You would have come across this feature in your device called airplane mode, but do you know what exactly it does? What are the uses it posses? Let’s take a look.

Almost all the devices such an iPhone, Android, iPad including windows PC have this option called airplane mode available on their short cut menu which can be toggled. Are you aware of the importance and the uses of this feature? If not let’s dive into see what it does.

In this article you will come across all the answers to your query on airplane mode. Here’s how,


What is airplane mode


This option called flight mode or airplane mode could be seen on almost all the devices that we own from iPhone to PC. When you toggle the airplane option on your phone you will notice the airplane icon that appears on top of your screen and all the signals get disconnected from your device.

It is named as airplane or flight mode because almost all the airlines doesn’t allow the usage of any wireless devices inside a plane while on board. This is probably done due the signals transmitted can interfere with the radio system inside the airplane so just to be cautious before hand.

What does airplane mode do?

The purpose of the airplane mode in your device is that, it stops all the signals and wireless functions of your device. Let’s see a few of them.
Cellular connections - Once switched on you cannot attend to calls as well as make calls, can’t receive messages or send messages and also cannot access mobile data in your phone so internet will also be disconnected.

Wifi - All the wifi connections will discontinue from working as well as not connecting to any wifi around you.

Bluetooth - Toggling on airplane mode will also remove your Bluetooth connection so you won’t be able to connect to your headphone or phone speaker, as Bluetooth acts as a wireless connection that covers a small radius.

Although turning on airplane mode will disconnect from all the wireless features in your device yet you can turn on wifi, data connection or Bluetooth if you really need it by toggling the specific buttons so only the service that you toggled will be working but still calls and messages will be blocked.

Let’s say you are using a modern version of phone and your device is connected to a Bluetooth, in this case if you turn on the airplane mode the Bluetooth will still be connected unless you turn the Bluetooth off manually by yourself. The airplane mode on the latest Android and iOS devices contains this easy features where you can adjust as needed.

It's not the same when It comes to GPS. Because radio waves don’t get transmitted but it still depends on the model of your phone. Sometimes when switching to airplane mode GPS might turn off too or sometime not, as the GPS are satellite transmitted.

So as we know maps work perfectly fine without connecting to internet but certain important features like live map and many other aspects of the map stops working when the wifi is disconnected due to airplane mode.

How to Toggle Airplane Mode on Android

Below are the steps that you have to follow in order to turn on the airplane mode in your device. Let’s take a looks.

To open the quick setting panel in your device swipe twice at the top of your device or you can also use two fingers to swipe down only once.


Now on the right you will come across the airplane mode icon. All you got to do is toggle the icon. In case if you don’t find the airplane option then you have to go to the side by swiping to find all the hidden icons.

Once you turn on the toggle option your device will disconnect all the connections and you will see the airplane icon which will be appeared on the top of the screen.

So in case if you are done with your airplane mode and want to change your phone back to normal then you have to follow the same steps as above to toggle it off. Do remember that the wifi or other network will be a little bit delayed in turning on once you toggle off the airplane mode.

So you can follow settings > network & internet > airplane mode if you are unable to swipe down the screen for the shortcut option or if you couldn’t find airplane mode on certain instances. Please note that the settings might defer in some devices.


Toggle Airplane Mode on Windows and Mac Computer

Tap ‘win + A’ to go to the action center on your windows 10 and 11, that’s where you will find the toggle option for airplane mode. On the bottom of the screen you will come across the airplane option and you have to toggle it to turn it on. That’s it, now all the connections and signals will be stopped instantly.

Sometimes this feature won’t be visible if it is hidden by your windows 10 device so to show more options you have to tap "expand". Tap "pencil" icon if you are using an Android 11 this will allow you to make sure that the icon appears.


In this follow up link you will find out option to use airplane mode In your MacBook as mac OS doesn’t posses these feature on their device.

Does airplane mode save battery?

The good news is, airplane mode sure does help you save some of those battery life on your device. Certain activities in your device definitely suck up all those battery due to the radio transmissions, Bluetooth devices, wifi notifications, cell towers and location detections will be always running on the background of your device.

So the easiest option to keep all these activities at bay is by turning on the airplane mode. This will keep your charge from depilating in certain conditions. Also the charging works pretty fast when the airplane mode is turned on while charging.

Wi-Fi in Airplane Mode

As the evolution of mobile devices, the recent devices still allows you to access internet manually even though the flight mode is turned on. In some modern devices you don’t even have to manually turn of the wifi instead it works even though the airplane mode if on.

To on the wifi on your device while the airplane mode is on you have to go to the "quick settings" which you will while you swipe two times on top of your device screen. Simply click wifi and it will turn on but give it a few seconds to start working (only if your phone allows this feature).

Even on an iPhone you have to toggle the wifi button as same like what we mentioned above. First you have to go to the control center to get it done. If your iPhone doesn’t have a home button then you have to swipe it down from the top of the screen to get the toggle option or if your device posses a home button then you got to swipe up from down.

One good news is that most of the airlines now provide wifi in flight which can be made use of once the airplane takes off. You simply can turn on the wifi or turn off the flight mode. Always make sure you have to ask the airlines if this is allowed before doing it and you are supposed to switch to airplane mode and turn off wifi while taking off and landing which is very important.

Bluetooth in airplane mode

Similar to the wifi connection the Bluetooth gets disconnected while the airplane mode is running other than on certain instances as mentioned above. Using the toggle option on your shortcut menu can turn it on manually. You don’t have to worry about using Bluetooth inside a plane as it isn’t at a powerful range to cause interactions (around 30 feet’s mostly)

If you want to use a keyboard, ear buds or any similar devices that needs Bluetooth then you can turn it on any time. Using a Bluetooth to listen to songs consumes very less battery energy than using online streaming.

Does airplane mode use data?

This of course is a big NO. Airplane Mode will prevent you from connecting to your network provider so you won’t be able to use data with airplane mode on.

Airplane mode on games

Using airplane mode while playing an offline game is a wonderful idea. We often encounter ads and pop-up messages when playing a game which gets pretty annoying so switching to airplane mode turn of your wifi and data connection which will prevent from sending ads.

Unfortunately we can’t do anything when a game requires internet as turning on the airplane mode will disconnect the game. So you can always play your favorite game with airplane mode which saves battery and also stops sending those annoying ads.

Do alarms work in airplane mode?

As you don’t need cellular or wifi connection to function your alarm clock, you don’t have to worry about turning on airplane mode. You can set your alarm like you usually do by going to clock app and then to alarm option.

Snapchat in airplane mode

Snapchat needs internet connection to work so it’s not possible to use it on airplane mode.

Receiving calls and texts in Airplane Mode

Cellular services will be completely disconnected when you are on airplane mode so it’s not possible to receive calls or text messages. In case if someone calls you while the airplane mode is on it will always indicate that your device is switched off and the caller will be directed to your voice main. Once you disable the airplane mode you will get all the previous messages which was set to you.

So as we all know, we can use wifi manually while on airplane mode and if you are using any messaging apps that work over wifi then it’s possible to receive calls and messages if it’s enabled. You can send messages as usual too as cellular network is not used here instead you are connected to the wifi network.

Listen to music in airplane mode

If you intend to play music over certain networks like apple music, Spotify etc then I’m sorry as it won’t work without an internet connection so the option for you now is to connect to the wifi even though the airplane mode is on so that you can play music.

There are certain instances that you won’t be able to play music or if you don’t have a wifi connection then all you got to do is get the subscription premium account in Spotify or YouTube so you can download music content from them with the help of a downloader app. This way you can even play music off line with airplane mode on.

There is another way you can play music is baby listening to already existing downloaded music in your device and play music on the phone by syncing to your device with help of an offline music player app.

So no you know how to and what to do with airplane mode on your device such as laptop or phone. Airplane mode is essential when you are flying to keep all the wireless network disconnected and also to keep your networks not connected. You still have the facility to switch on airplane mode and keep your wifi or Bluetooth connected when need.

Are you having any travel plans ahead? Then make sure you get all the necessary offline apps or media downloaded so that you don’t have to pay a large amount for the in flight wifi. You can also enjoy using your phone without having to connect to a wifi network.

Android Auto Tips and Tricks

Here are some tips and tricks to make your Android auto experience to the next level. Let’s take a look at some ways to unlock some useful tips and tricks so that we will have access to amazing features.

Have you come across android auto feature? If you haven’t then it’s time for your to take a look at this impressive feature if you drive a car. With this feature you can safely and easily have access to navigation, apps or your favorite music on the way. You can safely drive your vehicle while accessing these features.

have a more seamless driving experience with android auto and say bye to distraction. Let’s take a look at the tips and tricks to make use of this.


Android Auto and Google Assistant Driving Mode


A previous version of Android auto which was designed by Google allows you to access your phones display but they no longer available as they are supposed to support only infotainment unit in your car . Google assistant driving mode is what you have to make use of now, which somewhat has the same features with slight differences.

Below we will take a look at some Android auto features. Note that these tips and tricks can be used for driving mode as well.

Take Advantage of Google Assistant

It necessary to master the Android auto features and, the Google assistant plays an important role in voice command. The Google assistant helps in safe driving and to provided information’s swiftly. All you have to do is provide a voice command if you want to turn of that music, give a call or to ask a question. You don’t have to touch your phone while driving.

All what you have to do is say "Ok Google" or you can turn on the Voice command button on your steering wheel. This way you can easily ask a question or skip a song . You could also make a call while you’re driving with just your voice command. The driving mode also provides a mic icon that you can tap while driving which will activate the Google Assistant.


Tap "Hey Google detection" to make sure your Google Assistant is turned on. The option called “while driving” should be turn on in this menu. You don’t have to worry about turning on Google assistant if your screen is off because when the driving mode is on, your Google assistant will keep responding.


Certain common google commands would work even while you are driving but remember that not each and everything will be taken into consideration. Check below for the common questions you can ask so that google assistant will reply you instantly.

Give me a reminder in 30 minutes to buy some groceries.
Let me know the news today
Call Mary
How long would it take to go to park lane
Who won the world cup last night?
Stop song

Android Auto-Compatible Apps

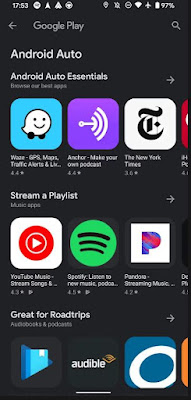
It is dangerous when you are distracted with certain apps while driving so many of the apps are not supported by android auto. Don’t worry because there are many important and good apps that you can choose from. Below are a few apps that you can get.

Head to the Android auto page that you will find in Google apps. Below are the main categories of Android auto apps that would interest you.


The first category is music. You can find apps like Amazon music, YouTube music, Spotify and Pandora.

Second one is messaging. In this option you can get WhatsApp, telegram, kik, Facebook messenger.

Category three is radio/news. Here you will get simple radio, iHeartRadio, ABC news, new your times, many other local radio apps you can get.


Google map is already a built-in app in android system navigation so this works well with Android auto. On Android auto you can also use Waze to navigate instead of Google map. Audible which is an audio book app will work too.

If you go to the driving mode or Android Auto, certain apps like music or radio will be shown if you have installed them. You can check what these apps provide you while you are driving.

A pop up notification will be seen when you get a new message if a messaging app is installed as the specifications are a bit different than the other apps that we saw. So if you get a message you have to cover the other person that you are driving so to let them know you can speak your message by tapping reply or you can also send automatic respond command.


If things get a bit annoyed and you no longer want to receive any messages the you can mute the conversation so you don’t get any notifications from those apps.

Organizing Android Auto App List

Your home screen already provides the apps that support your Android device on the home screen but the problem arises if you have too many apps installed and it is cluttered all over. This would definitely be a hindrance for your driving.

Don’t worry as you can always omit or rearrange the apps on your home screen. To do this go to "customize launcher" on the menu of Android auto app. Here you can decide what to do.


You can customize the apps as you want in the alphabetical order which will be the suggested app or you can select custom order. If you want to take off an app from your screen launcher then you can remove it by unchecking the box. The main inbuilt apps like phone or map cannot be removed.

Specify a Default Music Provider

Let’s say that you have installed many music streaming apps in your Android device, then confusion arises as the Google detection will be a bit hard to detect the app you prefer so there are chances that a wrong song will be played.


In case you have downloaded Spotify and you have upgraded to premium account but if you haven’t linked your Spotify with Google assistant then it’s not possible to access your song list. Things would get easier if you have already linked because all you got to do is command the song but if you haven’t then each and every time you play a song you have to mention it to the assistant the app name, that is Spotify after mentioning the song. Google assistant will wrongly detect your command in this case and tell you that "you are not subscribed to YouTube".

This is why you have to link your Spotify all to Google assistant before heading out to drive so you won’t have any complications.

To set up a specific option get to the auto menu option in your Android device and click "Google assistant" now you will find "music" option when you scroll down. To set the music app as default, check the list of music apps that you have installed. Make sure you don’t set a music provider as primary if you come across a linked icon. So before making it your primary you have to link it with Google assistant to that specific service works as your initial music provider.


After you are done with all the settings and allocate one app for this purpose then for example when you say "play some romantic music" the Google assistant will instantly play music’s from your designated app. In case if you want to play music from some other providers this time, then you can still command google, for example - "lay rock music from YouTube".

Organize Your Contacts Easily

It is important for your to maintain a clear contact list which is also clean so that it would be much easier for you to access while driving. Let’s say you want to call John then if you say "call John" and in case if there are more than one John the your Assistant will as you to be more specific. So your conversation with your Google assistant will keep dragging so it will be a hindrance while you are driving.

So to ward off this problem you can clear all the unwanted duplicate contacts and keep your list clear by adding the last take to those specific contacts. Google assistant will get complicated if you have emoji’s or characters that aren’t very clear to read.

Earlier in days we could only save one contacts per name but now it might have separated in many contacts with the same name so make sure you check your device for any such occurrence. Lets say you have Mike and Mike home as separate numbers in your device so you wouldn’t remember this when ever you make a call.

Few Other Android Auto Options

So you are almost set to get to the road as you have already know tips and you are familiar with the auto commands in your device but there are few more things to consider before your set to head to the road. Let’s take at the important settings that we should be looking into. All what you got to do is head to the android auto app and access the settings.


You can make use of the tweak for the options below if you prefer.

Turn on day and night mode for the app - While navigating this option you can select the mode you prefer for example night or day.

Automatic music - If you are an ardent music player it if you want that podcast playing in the background as soon as you get into the car, you can tweak this option on.

Weather - The top of the display of your car can indicate the condition and the live temperature if you turn it on.

Make use of the conversation notifications - If you want complete control over your phone then you can remove notification from those group messages or individual.


To make the first line of a conversation arear on top - When you stop your car somewhere then you could take a quick view of your conversation if it’s switched on.

Android Auto is Worth it..

So now you are familiar with those auto Android features that you can easily navigate. These are some of the wonderful options to keep you safe while you hit the road. One thing you should keep in your mind is that these features should not put you in danger so always keep your self focused on driving.

So now we are all set so even if you have some issues with the settings you could easily set them up.

Create an Emergency Panic Button on Your Android

Keep your Android device prepared for any emergencies or unexpected situations by creating a one tap panic button that you can access readily.

Emergency SOS features are widely integrated in Android as well as in iOS devices progressively. iPhone 14 enables users to send SOS messages no matter where you are, even while the Wi-Fi or cellular data is not available. This is done by using the satellite features which is something to be praised for.


Android has revamped their emergency SOS features targeting a possible upgrade to their newest android 12 to keep up with the trend. Although these features are so important and impressive they are limited to a certain extent. Adding a panic button on your phone is a good move if you own an Android device, this will give additional security. Let’s take a look at the simple steps below to get it done.

Why Do You Need an Emergency Panic Button?

Let’s say you are in an unexpected situation such as encountering a theft or during an emergency medical shortage then you have the tendency of panicking and unable to come up with a solution, in this case you can easily access the emergency panic button to get quick assistance or help from someone. Adding a panic button is like extra safety to your device which will ease your mind.

Creating an emergency panic button in your Android device is a smart move because you don’t know when a calamity would strike, so keeping yourself prepared before hand is ideal. This feature is something that comes in handy when you are in an alarming situation where critical thinking goes out of the window.

Without further Ado let’s take a look at how to create this panic button in your Android phone so that you can make use of it in an emergency.

Panic Button Using MacroDroid

Other than the built in SOS features, the Android doesn’t have any emergency features that are hidden, So for this reason you can use certain automated apps like MacroDroid to build a panic button in your Android phone. You will also come across other automated apps that can help you with this function but not all the apps are convenient like MacroDroid. It has simple functions to follow which isn’t complicated.

When it comes to accessibility, the functions should be available on the quick setting menu so that you have easy access, that is, when you trigger the button it should:

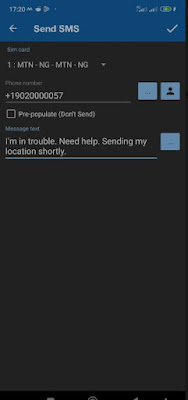
Send you an SOS SMS message which is readily customized that will mention your last location.

Dial 911 immediately without your attempt.

You can also add many other emergency actions to this list like send SMS every three minutes depicting your location or even capture a secret picture and shoot a video, but let’s keep it low-key by sticking to only these two actions which won’t lead to complications.

Step 1 : Create a Macro

First you have to download the MacroDroid app by going to the playstore. In app purchase it is available in case if you want more updated features but the basic one is completely free.


Once you are done installing the app, launch it on your home screen and then click add macro.

Now you can type your macro name on the area which is mentioned as enter macro name. Here in this article we will use “SOS message” as our name.

Next to macro name input section you will find a small icon which looks like a file. Tap on to the file icon.

You can enter description to your macro if you want but that is only optional.


Step 2: Create a Quick Settings Button and Trigger

Once you are done with the above we need to setup a trigger button on the quick set menu to activate the SOS message. This should initiate all the configured SOS actions with a single click.

Go to MacroDroid home screen and on top of the trigger panel you will find a plus (+) option, click on it.


This will locate you to the specific area and then tap MacroDroid specific, once done choose quick setting tile and then configure settings tiles.


You will be directed to the next page. Now tap on the tile slot that are inactive on the quick settings. Here we will use MacroDroid tile one, which is the top empty slot available for example.

Enter "panic button" or your desired name on the "enter label" option that you will find under input area.

Now you will come across two radio buttons under the input section. Now click "button" label and then check "collapse on press" on the check box.

To allow the slot head to the right side of the MacroDroid tile and then disable it by toggling.

To select your panic button icon, go to the left side of the tile slot where you will find the settings and then pick your desired icon.


Head back by tapping back option on your phone or swipe back.

Next you will see the name that you chose on the quick setting tile now press Ok and toggle on/ button press then tap OK.


Step 3 : Add the Actions

We are now done with setting up the panic button. Now we will have To look into the performance that’s going to take place while we tap the button. Let’s dive in:

Go to the home screen of MacroDroid And then you will see a plus (+) icon above action panel.

Now you can add a phone number of someone who is trustworthy by clicking message > send SMS. You could also add emergency services if you wish.


Next you can add an emergency message that would indicate that you are in danger for e.g."help me, GPS will be directed to you soon". You will find the message adding field bellow phone number section.


Time to save all the information that you added. Save option could be found on the upper right corner of the screen. Now you will be returned to the MacroDroid home screen.

Now send in your aligned GPS as a take action immediately message that can be accessed through Google maps in the form of a link. This is how:

Head to action panel and click the plus(+) option.

Now tap location and under that tap force location update.


Return back to action panel and click the plus (+) option again.

To enter the desired number press location > share location > SMS > Ok > select number and then type in the trusted number and hit OK.

Finally if you have multi sim devices choose the sim that you prefer and then hit Ok option.

Now you are all set to send your location to the reliable contact in your list in an emergency situation. If you want to send you location to more than one person then you can follow the same steps as above. The location can be send to as many people as you want. We will now take a look at how to call an emergency number like 911 under cover. Here’s how:

You should go to the action panel again and click the plus(+) icon once more.

Click phone > make call > (select number).

On the add phone number section enter any emergency department number or type 911.


On the lower right corner of the editing screen click the check mark option. This will ensure that you save everything before you close.

Step 4 : Add Your Panic Button to the Quick Settings Panel

To get your emergency panic button to the quick setting of you phone menu, you have to follow one last step.

To unveil your quick setting menu, swipe your phone screen down from the top.


Now to get it into your quick setting menu click the edit option and the shortcut for MacroDroid tile 1 should be added.


That’s all, now your emergency panic button will be readily available on your quick pull down menu on your device which can be accessed easily. All your previously added settings will be come in handy while tapping the panic button, if you follow all the steps given above correctly without missing any.

There’s room for improvement

We have only provided you with the simplest specifications in this article but there’s more features available that can enhance your potentials further more. Capabilities like the below given examples can be considered.

You can send an audio recording that’s been secretly recorded for a designated time to the person in your emergency list.

Instead of other messaging networks you can send an SOS message link to an email address.

Other messaging platforms such as WhatsApp or Telegram can be used to send the SOS message.

You can also send your medical records to a desired emergency contact.

In case if your mobile information and data is under threat, you can immediately execute an attempt to clear all your personal information from your device.

There are more options that can be followed in order to protect you from an emergency crisis which need a bit of work.

MacroDroid is Handy..

Nobody like to fall into an emergency situation where they don’t have any safety precautions, so doing things prior can help you set clear from such situations. Sometimes you might think that this is a lot of work and also wouldn’t help you in such situations but this one single tap could save you from a life threatening situation that you will be thankful for. All you got to do is set some time apart and get all the settings done.

Secure Android Phone Before Sending It for Repair

There are several things that you should do before you give your phone away for repair to safeguard your personal data and information. Let’s see how,

Sending your phone to repair to the repair center of your phone’s manufacturer doesn’t guarantee you it’s safety. If you think it’s safe then you are wrong.

Although taking your phone to it’s repair center is much secured option than taking it to those shady repair shops on the streets but those reputed repair centers still have prying individuals who sneak into other people’s privacy so we should be aware of the risk it pertains to repair our phones no matter where it.


But luckily we have certain options that we can follow to keep our data safe and secure while the phone is out for repair.

Your Data Isn’t Safe While It’s Getting Repaired

As per the study of Cornell university which was held in 2022 says that our Android phones are still at risk while we give it to those repair centers. They gave the statement "no privacy in the electronic repair industry". During this research period, researcher’s send around 16 laptops that of windows possessed with dummy data which will spy at the technicians interaction with the devices.

So if we take a look at the research sheets we understand that 6 laptops were breached by the repairing individuals out of 16. Personal files were accessed in those 6 laptops. The worst part is, 2 laptops files were accessed and uploaded in other devices.

Now you see why taking precautionary measures are very important while sending your device out to repair. Even though the company performing it is trusted you still cannot make sure how each individuals are. Most of the people now are so curious to see what other people do in their lives which makes them eager to take a sneak peak into the phone they repair. Who knows if they take a person picture of yours and upload it elsewhere?

So to steer clear from these unwanted issues we can do certain things that can secure your phone by google lock down feature before you send it to repair. This isn’t a tough job to do, so let’s dive in and check how to back up your data first.

Back Up Your Data

If you own a rooted device which is powered then Android have these back up features like titanium backup that will ensure you to give a situation. Other than that if you don’t want any complications then the best option is to go for Google one to backup your device.

If you are already using Google backup services then you might know that you get only 15 GB of storage in the free version and if your storage is full you have to upgrade it to the advanced plan in order to obtain more space. Whether you want to buy more space or not is determined by how much data you are going to backup or your current usage of data including all the other google services that you use. Now let’s see the steps to backup data:

First you have to get the Google one app from the play store if you haven’t installed it already.

Open app once you install it and then click Storage.


Now beside the Device back up you will find a gear icon, select it.

Now you can choose the data that you want to back up by tapping manage backup.

Click backup option now.


If you have all your photos and videos in your Google photos then your data will be easily backed up but it’s not possible for Google to catch each and everything. Google can backup your video, photos, call logs and even your text messages if you want to.

So if you are giving away your phone to repair and you have very important data in certain apps that you don’t want to delete or you don’t want it exposed then you got to back up the data from each app and then restore it back to your phone once your device is back.

Samsung Maintenance Mode

There’s this feature called Active maintenance mode in your Samsung device which you can made use of before you give your phone to repair. You will then find a maintenance mode icon on your status bar that no one will notice. Doing this would make your device look like has been reset through your factory settings.

If you follow all the steps above then you don’t have to worry about shipping your phone for repair accept if you have a SD card inserted into your device. No technician or anyone can now access your devices data.

Delete eSIM Profile/ Remove the SIM Card

If you fear that someone might exchange your sim, then your sim profile should be eliminated from your device so that they don’t find any clue. How to remove eSIM profile? Let’s take a look.

Go to settings in your device.

Click Network & Internet > SIMs

Now tap the option Delete SIM

That’s it, and if you own a physical SIM inserted to your phone them all you got to do is remove it.

Your phone should be switched off.

On the side of your mobile phone you will find the sim tray, besides the sim tray there will be a small hole. Get a paper clip and insert the end it into the hole.

This will help the sim tray to pop open, now pull the tray.

Next take off the SIM from the tray and push it back inside.

Unmount and Remove the SD Card (if applicable)

So now we are done removing the SIM card from our device and now it’s time to remove your SD card if you have inserted one in your device. As the first step you have to remove the SD card. This should be done by heading to settings > storage > unmount SD card > OK. That’s it! This is how you take off the SD card from your SD card tray. Isn’t that easy to do?

Factory Reset (if possible)

Factory resetting your device is essential if you use other Android device other than Samsung. Doing this is easy but the steps are not the same in all the Android devices, it even different from once Samsung model to another. Let’s see the basic steps.

Go to settings.

Now select reset options.

Click the option called Erase all data (factory reset).


This way all your data will be erased completely from your phone as if you just bought it. That is why before you do a factory reset, you should ensure that all your important data are backed up in a safe place. In case if you are not willing to erase all your data entirely because you fear that you might loose something, then follow the bellow steps.

Factory Reset a Broken Phone

Google find my device app is the most convenient way to remotely factory reset your device although there are many other apps available out there. Do you know that find my device option is also accessible through your web browser? Now let’s see how you can access it through your browsed.

Head to your we browser and open find my device.

At the very beginning you will find your phone’s icon, tap into it.

Choose Erase Device.

A disclaimer will be shown on what will happen to you device if you choose to reset your device.

To do it remotely you have to click the option erase device once more.

Recovering mode is not the same in all the devices. There will be slightly different variations in different phones. You can also factory reset your device through recovery mode. This is how you do it:

Switch off your device.

Now press and hold power button and also the volume down button together (please note that in some devices volume up button is used for this purpose).

Keep pressing these two buttons until recovery mode option spears on your screen so that you can navigate the menu.

Now click power button.

Now a "no command" label will pop up while the phone restarts. In certain devices automated the recovery mode is available but in some phones you have to keep in pressing the power and volume button to trigger the recovery mode. If things are complicated in booting don’t hesitate to reach to your phone manufacturer.

So once again you have to trigger the volume button when the recovery mode is on process. From there:

Wipe date/ factory reset should be highlighted.

Now the power button should be clicked.

To reset the phone do the highlight and then click yes option. Once again go to the recovery mode.

Reboot system should be highlighted now and to go back to the normal nature of the reboot, tap the power button.

You are successful done with the factory reset of your phone.

That's it.Who would want an unknown person to have access to their personal information such as photos and videos from their phone? Most importantly our financial apps and information’s are under threat if we give our device for repair. Keep your information’s and private data safeguarded by following the steps above before heading to your repair technician. Let’s be awake before things go haywire.

How to Remove, Change and Set Default Apps on Android

Here’s a comprehensive guide on everything you need to know about managing default apps on your Android phone and adjusting the behavior of links.

You will have certain preference on how the apps in your Android device should perform different tasks although they allow performances such as allowing you to choose which web browser, email client, SMS apps and other tools to be used. This would work automatically when you access content that are related.

From extracting defaults apps, how links open and how to change features in your default app will be thoroughly explained here in this article.


Default Apps in Android


Do you know that the default app in your Android device have the ability to assign which app should perform specific task ? In case if you have more than one web browsers installed, with no settings imposed on default app and you click a link, then your phone will request you to choose the browser that you prefer. So to make things easy you can keep Up to date with default app settings so that you don’t have to encounter this problem every time you click on a link.

Let’s take a look at how to customize your default app to make things easy if you haven’t assigned default app for certain categories.

Set New Default Apps on Android

A prompt will instantly pop on your screen asking you to select which app to use in case if you don’t have a default app assigned for specific actions or you install a new app that can perform the task. The look of the prompt can vary depending on the version and manufacturer of the device as per the UI element of your Android.

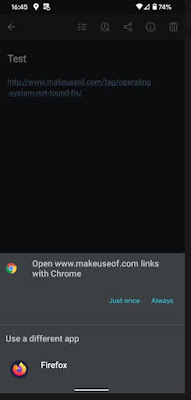
So if you want to make the suggested app as your default app for that specific action then you can tap 'Always’ which can save your time and make things easy for you and next time you won’t have to put any effort. This will ensure that your future actions will do the same. What if you want to use this action only for one time? Then you have to select ‘just once’ instead of making it default.


If you want to do it on a different app then you can always choose the one you prefer from the list provided. Next time when you perform this action, this will show on the top preference. You will see the option to set it as default if you wish to.

How to Review and Change Default Apps on Android

You will come across the menu of default app on stock android 12 at settings > apps > default apps. Please note that these settings would differ according to each phones.


Below you can take a look at the default apps that are in use currently for certain categories in your device.

Browser App - This feature is used in order to open the links you click.

Caller ID & spam Apps - This will ensure that you don’t get any spam calls by blocking them instantly. Google call app in your phone and also true caller is included.

Digital assistant App - This helps you identify your screen behaviors and controls voice working as a smart assistant. Alexa and Google assistant are some of the examples.

Home App - This helps you arrange and access apps on your phone as a default android launcher. Nova launcher and pixel launcher are two examples.

Phone App - Simpler dial and the phone app of Google are examples for this. This is what helps your device answer and make calls.

SMS App - This app is what manages your text messages allowing you to send and receive. Two examples are Googles messaging app and pulse SMS.

Tap on the category catered towards your specific needs, to review the installed Apps. You can choose which one you want to set as default if you have more than one app installed for a certain category.

Now any link that you follow will use the app automatically as you have set a default app. Let’s take a look at some examples, if your default phone app is changed, when ever you go to your web browser and tap a phone number, your default app will launch.

There are also other categories available other than the ones that are mentioned above. When you attempt to open your camera through shortcuts while using a camera apps that has been installed using a third party app (for example let’s say you have a pixel phone and use the power button pressing two times). In this case you will be asked by your phone, which camera app you want to use.

Remove Default Android Apps

You can dismiss all default settings of a particular category of that specific app. Let’s see how you can remove it. Here’s how you do it, go to settings > apps & notifications > see all X apps now you can remove the defaults from the app that you prefer.

When you are directed to the app settings, you have to widen the advanced section (only if it is needed) and then click open default option. Now if you take a look at the lower part of the page you will come across clear default or clear default preferences and you can tap on it to dismiss those settings in case if the app is set to default for any actions. Now you can select the app launcher that you prefer when ever you open it, instead of the app taking over the actions.


This feature is not available in the latest Android devices which is not a good thing. When you take phones such as android 12 or 13 you have to abide by the forceful action to choose the category and also clearing the apps default browser is not possible.

Choose Default Apps for Opening Links

We are done with information about default apps on Android devices and now we will take a look at another important aspect that is, the app links.

When you tap on a website link on your Android device and the specific app that is related to the link is also installed then instead of opening the link on your browser the device can take you to the URLs inside the same app. This is what you call deep linking in android advancement. For example, let’s say you tap on a YouTube link, you would want to watch the video within the YouTube app not directing you elsewhere.

You can assign the link to open on your browser or the specific app although you cannot change the URLs opened by a certain app.

Change Link Opening Settings

Do you remember that we visited the default app page in the beginning? All you got to do is return to the same default app to alter how certain links open. To review the links you have to press opening links.


Some apps can also be used without you having to install them, to get this feature, head to the top and all you got to do is toggle the feature.

If you take a look at the section below you can find area where most of your apps are installed in your device. If you chose one of these apps then you will be directed to open by default page where you will come across two fields displayed.

So when you tap open by default which contains two options for the selected apps. One option give you the specifications to see if you want to open compatible URLs which is known as ‘open supported link’. If you come across older versions of the android phones then you will be asked for permissions such as ‘open in this app’, 'don’t open in this app’ or ‘ask every time’ but if you own a latest version of Android device then this option will be available on your slides.

‘Verified link’ can be tapped In order to identify which URL the app can access (in case if it’s an older versions of Android, then ‘supported link’ will be shown) this way you can view the detailed list. So if you Take YouTube app then links such as YouTube.com, m.YouTube.com or YouTube.be will be directed to you instead of other apps. Sometimes you will be able to choose the domain that you want to access that’s available within the app.


Disabling In-App Browsers

When considering default link behavior there’s another setting that you can take into consideration. Telegram, Twitter, slack and Gmail are some of the commonly used apps that have their own inbuilt app browsers which also has the ability to keep track of your activities. Therefore, through these apps when you try to navigate a webpage it will be opened within their own browser window not through the specific app or default browser.

It's bothersome to open a webpage using an in app browser when you are not logged to those sites, that’s the reason why deactivating this feature is the best thing to do. Not all the app has the same location to access their settings but mostly the settings will be seen under ‘open link externally or use in app browser’.

The steps are settings > chat settings > in app browser’ are the order to be followed on telegram app.

Expand Default Apps With Third-Party Solutions

The default option that’s built in android is sufficient for many users but in case if you need more features to be added then you can try a few apps such as :

Better open with,

By making use of this particular app you can revoke it anytime when you establish that specific app you prefer. audio file, dialer, email and browser are some of the categories you will be presented with when you open the app.


Now you can choose the category that you prefer and then click the icon which looks like a start next to the option you chose. In case if you are not interested in some apps and you don’t want to see them in future you simply can hide them by tapping the eye icon. If you want to select preferred settings for each websites then you have the ability to make use of the drop down box, that will be found at the top. For example you can take Twitter or YouTube.

Now you have the possibility to access a certain link that is catered towards it. Now tap ‘better open with’ and select 'Always’ when you have the option of choosing the desired app. A list of suitable apps and a countdown panel will be shown when you chose ‘better open with’ option. The determined app will be accessed if you fail to chose one before the designated time.


So when we take a look at this ‘better open with app’, it isn’t flawless but you can give it a try to use some of it’s features if you like it as it is completely free of charge. The reason why it isn’t perfect is because not all the default app actions such as SMS is supported (which is a big deal) and update takes ages.

Open link with…

‘open link with’ is another app that you can use if you want to have more control on links on your device by altering the default app. Your android device doesn’t allow you to open links linked to specific apps automatically so this app comes in handy to do It. So usually you are directed towards the specific apps when you click a link like Twitter or YouTube but this app allows you to open the link on your browser.


First you have to install the app on Play store and then tap open link with app. Now you will come across a tutorial on how to use it. For a better function allow permission to access app usage as a final step. It’s all done, now you don’t have to think about it anymore. In case if you want to do the same with other apps then follow the step above once again.

Ok so now you want to do the same with another app In your device then go to your browser and click the three dot icon which is the menu button and choose share option. Now you can take a look at the list of designated app for those specific apps by tapping 'open link with’. From here onward you can select ‘always’ if you want the change to be permanent and ‘just once’ if you want to be asked once again when you do it next time.

If you want to open the content in two different apps often or if you have problem while accessing like not functioning link, it’s better to look into it although it’s somewhat related to built-in function.

Default Apps on Android

Once you already setup default app on your phone, it will be so convenient in the future that you won’t even remember it except when you get a new app. Now you are in full control over your apps. These are the very basic settings that are available so in case if you want more advanced features you have more options available for that.

You can get some interesting apps downloaded and installed in your Android phone if you haven’t experienced anything outside the standard default app selections.

Best Android 14 Features That Users Want in 2023

Android 14 launch is going to be so exciting and we can’t wait to know the features that will be included. Here are some we assume will be available on it.

People are so anticipated to receive the new android 14 that is to be released on 2023 although android 13 have not updated in some devices yet. As we all know the android devices are pretty impressive but there are still certain features that needs a bit improvement to enhance the experience of the users, that is, they need to add a few more features.


Below are some of the features that we expect to witness on the new android 14 which is to be released on 2023.

1. Stacked widgets

Our home screens gets cluttered and disorganized over time as we keep downloading apps and widgets. If stack widgets feature is available then we have to consider ourselves lucky as we can reduce the space all the apps take and also declutter the screen.

This features can definitely help us with reducing the app space that is consumed by stacking each widgets onto each other so that we have a clean screen that doesn’t overwhelm with items that are too many. One UI 5 updates on Samsung phones already contains this most needed feature although it was first introduced only on iPhones. Wouldn’t it be amazing if this feature is updated on android stock devices very soon.

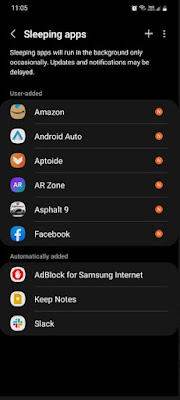
2. Put apps to sleep

Switching your unused apps to sleep mode would be another interesting feature that we would love to see on their latest Android 14 updates. The power of the processor, life of the battery and also RAM life would be much more improved when the apps don’t run on the phone background which is of no use. This can uplift the quality of the device usage.


There are apps that you can download from the playstore to help you but these apps cannot be trusted as they have issues like crashing midway, not sending notifications Etc. So it’s always better to have an inbuilt app that has these functions.

3. Lock individual apps

Keeping certain apps locked is a way to ensure extra privacy is something needed. Apps such as banking, investment, messaging, gallery are some of the important apps that we will want to keep away from prying eyes. Locking of individual app with a password is not an inbuilt feature on Android apps which is a disadvantage but some phones like Oppo's colorOS and Xiaomi's MIUI provide this feature which is interesting.

You wouldn’t have to worry about someone accessing your personal information even if they use your phone when all the important apps are locked. This give the possibility of sitting back and feel relaxed when someone is using your phone.

4. Battery health indicator

Compared to the initial stage our phones battery health gets declined gradually, as the capacity reduces the ability to hold the charge for a longer time. This happens when the usage bypasses over the years which is a natural degradation process of the hardware of battery.

It is possible to check the health of the battery in iphone but android devices doesn’t possess this feature yet. It is better to maintain around 80% of full charge when your battery capacity passes it’s 800 cycle . Changing the battery after every 2 years is recommended if you are charging your phone once daily.

5. Built-In Temporary Email Addresses

Temporary Email Address generating tool is not currently equipped in any of the mobile phones. We suggest android leads other phones in taking initiative to bring this feature to lime light. This would be a wonderful solution to avoid unwanted emails and spams that comes from signing into different apps and sites. If you have a temporary Email Address then you don’t have to share it with all the apps and sites.

The advantages of having this inbuilt Email feature is much easier for user to create address with just one tap and then copy paste it where ever they want to and when ever required. This would be great if you want your primary email address to not get bombarded with spam and marketing Email which can avoid you from being subscribed into those mail lists.

Clutter free inbox and extra privacy is what we all expect. Who wouldn’t like a clean and privacy protected email address.

6. A “My Ad Center” Menu in Settings

‘My ad center’ is launched recently by Google which enables users to have control over their apps by regulating a certain category to be seen more or to minimize the ads they see on platforms like YouTube, google search and discover. This gives more openness to the ads the users come across so they can have a pleasant online ad experience.

This feature is not yet integrated into Android devices so people are still unaware of this useful feature. This feature would be much better for people to prioritize the preferences of their ads If my ad center is readily available on the android device. It will be easily discoverable if it was on the settings menu of the phone.

7. Better Lock Screen Customization

As we all know android devices have been celebrated for more flexibility and users friendly features with many choices but lately iPhone has become more customizable like customize lock screen by Changing font, color and also modifying their clock style. Which is way more convenient in lock screen modification. You even have the ability of adding widgets.


Many features are lacking in android devices even though they have improved locks screen customization on the latest Samsung one UI 5. We believe that the latest update will bring this feature in android devices so that you can easily customize lock screen and on the top of the screen widgets can be added.

8. Manual Control Over Material You

Al though the material You design In Android 12 looks pretty amazing and has improved significantly by google, it still lacks certain customization options for each UI elements which need to be looked into.

You only have the option of choosing color palette that was suggested by your system and then the color applies automatically determining it’s own match and the algorithm. You don’t have the options for choosing your own color and customize them for each element you prefer such as clock widget and quick setting. Many users want to be creative or give that vibe to the device by picking up their own preferred colors. This would enhance the personalization ability of the users.

9. Lift a Subject From the Photo Background

The recent iOS updates on Apple 16 posses this amazing feature called subject isolation. This feature allows iphone users to easily remove background from an image and then share them with others. This build in feature is easy and remarkable which adds more value to the update .

You simply have to choose a picture and press long on the subject of the photo. This will draw an outline around the image you chose so that you can easily drag into a text box, copy paste it on your clipboard and share it with anyone you wish. This easy and fast feature should be available on android devices as well so people can make use of this wonderful feature. We hope android 14 comes with this fun feature.

Android 14 Could Be So Much More

Aren’t we all a little bit eager to see what android 14 brings to the table this time? They might have some of the above qualities such as screen customization or battery improvements attached or maybe they would wait for Android 15 update to add some of it. We have to wait and watch if they also add battery indicator, stack widgets feature and app locks.

In terms of cool new features iPhone stands on the top as of now. The competition might heat up once the android 14 release in 2023. We are waiting for exciting innovations from the latest Android.


Lock Unlock Android Phone with Voice Using Google Assistant

Google assistant has some wonderful features that helps you access your device without you having to physically touch it along with that you also have this amazing possibility of unlocking your smart device with your voice command on hands free mode.